Tilemaps
Build levels out of a grid of reusable tiles — terrain, platforms, walls, decoration — and get collision for the solid parts without placing a single collider by hand.
Tilesets and tilemaps
| What it is | |
|---|---|
Tileset (.jtileset) | One image sliced into a grid of numbered tiles, plus what each tile means |
| Tilemap (a component) | A grid in your scene that paints tiles from a tileset |
One tileset, many tilemaps — the same terrain set used by every level in your game.
Making a tileset
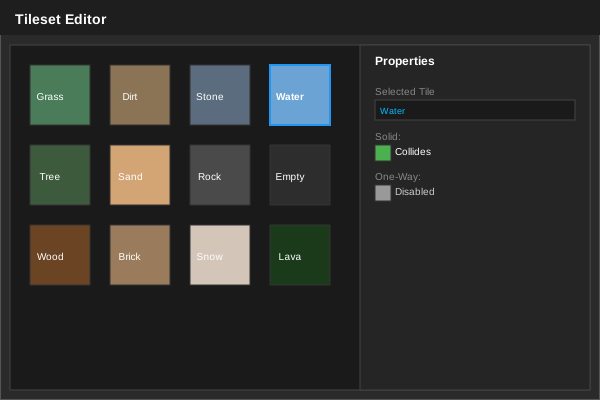
Open the Tile Palette panel (Windows → Panels → 2D → Tile Palette) and press New…. In the dialog:
- Drag a
.pngor.jpgfrom the Content Browser into the texture slot. - Set Tile size — the width and height of one tile in the image, in pixels.
- Set Spacing and Margin if your image has gaps between tiles or a border around the outside. Most exported tile sheets need
0for both. - Press Create and choose where to save the
.jtileset.
The panel now shows every tile in the sheet as a grid you can click.
Shortcut from a Tilemap
If you drag a raw image straight onto a Tilemap component's tileset slot, the editor offers to run this same New Tileset flow for you.
Painting a level
- Add a tilemap. Right-click blank space in the Scene Hierarchy and pick 2D → Tilemap, or add the component to an existing entity with Add Component → 2D → Tilemap.
- Assign the tileset in the Properties panel.
- Pick a tile in the Tile Palette by clicking it. Drag across several to pick a multi-tile stamp.
- Choose a tool and paint in the viewport.
| Tool | What it does |
|---|---|
| Brush | Paint the selected tile. Brush size widens the stroke |
| Erase | Clear cells back to empty |
| Rect | Drag out a rectangle and fill it |
| Fill | Flood-fill a contiguous area |
| Pick | Click a painted cell to make that tile the current selection |
| Off | Leave paint mode, so viewport clicks select entities again as usual |
Painting is a deliberate mode — you turn it on to paint and off to go back to normal editing, so you can't scatter tiles across a level by clicking around in it.
Paint strokes are undoable with Ctrl+Z.
Cell Size is world units, tile size is pixels
The tileset's Tile size says how to slice the image. The tilemap component's Cell Size says how big a tile is in the world. They're independent — that's how a 16-pixel tile set and a 32-pixel tile set can share the same grid.
Collision
Collision comes from the tiles themselves.
- Mark tiles as solid. Select a single tile in the Tile Palette and tick Solid. Do that for walls, floors and platforms; leave decoration unticked.
- Turn on colliders. On the Tilemap component, enable Generate Colliders.
That's it. Solid tiles now stop physics bodies. The engine merges runs of adjacent solid tiles into larger rectangles rather than making one collider per tile, which keeps the physics cost down and — more visibly — stops characters catching on the seams between neighbouring tiles.
Friction, Restitution and Density on the Tilemap component apply to all of it. Colliders rebuild automatically when you change tiles at runtime.
Tile tags
Alongside Solid, each tile can carry a Tag — a short piece of text like ice, lava or spikes. Tags mean nothing to the engine; they exist so your scripts can ask what kind of ground something is standing on.
One-way platforms
Jumping up through a platform and landing on it from above is a Box Collider 2D feature, not a tile one — put a separate entity with a one-way box collider where you want that behaviour. Scripts can let a character drop through with IgnoreOneWayPlatforms. See 2D Physics.
Layers
Use several tilemap entities rather than trying to layer within one — a background map, a terrain map, a foreground map. Each is an ordinary entity, so its sorting order in the Properties panel controls what draws in front of what, exactly like sprites.
Only the terrain layer usually wants Generate Colliders on.
Changing tiles from a script
public class DestructibleWall : GameEntity
{
    private TilemapComponent m_Map;

    protected override void OnCreate()
    {
        m_Map = GetComponent<TilemapComponent>();
    }

    public void Explode(Vector2 worldPoint)
    {
        Vector2Int cell = m_Map.WorldToCell(worldPoint);
        m_Map.SetTile(cell, 0);            // 0 clears the cell
    }
}| Member | What it does |
|---|---|
GetTile(x, y) / GetTile(cell) | The tile id in a cell. 0 means empty |
SetTile(x, y, id) / SetTile(cell, id) | Paint a cell. 0 erases it |
GetTileTag(x, y) / GetTileTag(cell) | The tag on whatever's in that cell |
WorldToCell(worldPos) | World position → cell coordinates |
CellToWorld(cell) | Cell coordinates → world position |
Clear() | Wipe every painted tile |
Tile ids are one-based
A tile id is its index in the tileset plus one, because 0 is reserved to mean "empty". The first tile in your sheet is id 1. If you're building ids from a known index, add one yourself.
Combining the two, you can read the ground under a character:
Vector2Int under = m_Map.WorldToCell(new Vector2(Translation.X, Translation.Y - 0.6f));
if (m_Map.GetTileTag(under) == "ice")
    m_Friction = 0.05f;
Changing tiles rebuilds only the affected part of the map, so runtime edits — destructible terrain, a procedurally generated cave — are cheap enough to do while the game runs.
Importing from Tiled
Maps and tilesets authored in Tiled can be imported directly — .tmx maps and .tsx tilesets. Features Joystick doesn't have an equivalent for are skipped with a message saying exactly what was dropped, rather than silently.
Keeping large maps fast
- Only visible chunks are drawn, so map size costs you memory rather than frame time.
- Tiles batch into very few draw calls because they all come from one atlas.
- Turn Generate Colliders off on decorative layers — collision is the expensive half.
- Bigger tiles are cheaper than smaller ones for the same area covered.
See also
- 2D Physics — collision, triggers, one-way platforms, and queries
- Scenes — organising levels
- Performance — measuring what a big map actually costs